


Remote Procedure Call (RPC) provides a protocol for users to interact with the network service without understanding its details.
When finishing coding the basic components of my CorDapp, an idea comes to my mind — “Ticket buyers won’t have the idea of how the flow is executed and designed. Why not use a GUI to visualize operations and make the application more user-friendly?” After going through the auction application sample, I believe this is not just an expectation, but something I can achieve. The whole process is about building the web server layer based on Spring Boot and then coding the UI page.
This blog is mainly about building the web server layer, which translates RESTful HTTP API call into RPC requests for the Corda node. I further divide the section into configuring the RPC port for our web and programming the API.
Configure RPC port:
For this task, we can mostly copy and paste sample code with some changes. Here, I’ll list which files I modified to adapt to my own project with my reasons.
build.gradle:
We define at least one RPC user to let the node owner interact with the RPC. The RPC user is assigned a username and password. The parameter ‘permissions’ defines what flows an RPC user can use. For our system:
rpcUsers = [[ user: “user1”, “password”: “test”, “permissions”: [“ALL”]]]
The above code grants the RPC user named ‘user1’ to log on to the Agency node with the password ‘test’ to perform all RPC operations (including starting any flow).
Configure RPC user for each Corda node:
node {
 name "0=Agency,L=London,C=GB"
 p2pPort 1008
 rpcSettings {
  address("localhost:10009")
  adminAddress("localhost:10049")
 }
 rpcUsers = [[ user: "user1", "password": "test", "permissions": ["ALL"]]
}
application.yaml
We use the YAML file to configure the Spring boot server. In this simple code piece, we specify the address of the Agency node as localhost:10009 to the application. This refers to the rpcSettings.address value in the project’s build.gradle file.
Specify the host address of the Agency:
Agency:
host: localhost:10009
In this file, we can also define the address for accessing the server for the whole project using server.port: 8085. This way, we can just type ‘localhost:8085’ to interact with the whole application.
AppConfig.kt
The annotation ‘@Configuration’ enables this file to use parameters defined in the application.yaml. @Value() is used to specify the address of the node user. For example, the AgencyProxy now has the value of ‘localhost:10009’, then we log on to that node ‘user1’ with the password defined in the project’s build.gradle file. After that, we use the ‘.proxy’ to get the full RPC interface of the Agency node, which is defined as the CordaRPCOps type.
Configure AgencyProxy and get a returned instance:
@Configuration
open class AppConfig : WebMvcConfigurer {
 @Value(value "\${Agency.host}")
 lateinit var AgencyProxy: String

 @Bean(destryMethod = "")
 open fun AgencyProxy(): CordaRPCOps {
  val agencyClient = CordaRPCClient(NetworkHostAndPort.parse(AgencyProxy))
  return agencyClient.start(username "user1", password "test").proxy
 }

}
Program the API:
The HTTP APIs will map directly to the Corda flows in a 1:1 ratio to allow the UI to initiate each type of transaction. It has three main roles:
- Return the data to the user’s vault
- Search queries and insert new data into the vault
- Switch users
- Return the data to the user’s vault :
The annotation: @GetMapping is usually used in this case to help specify that this is a GetData type. We use (value=[“getVenueState”], produces = [APPLICATION_JSON_VALUE]) the value variable specifies what’s the route name and the produces parameter defines what’s the returned data type. The returned data type is usually the APPLICATION_JSON_VALUE, which can be recognized by the javascript file.
Then in the function body, we use vaultQuery() function to get the assets in the user’s vault.
For example, we can know the user’s VenueState’s status by specifying ‘getVenueState’ in the post route. We also turn this result into a JSON format, which is parseable and can be shown on web pages.

- Search queries and insert new data into the vault
This process is usually completed by starting a flow in that proxy. With the information we took from the user end, we firstly formalized it into the prescribed form format, which is mostly similar to the following samples.
Format the user’s request into a prescribed form:
class RequestForm {
 var venueId: String ?= null
 var agency: String? = null
 var price: String? = null
}
After that, we use startFlowDynamic() function to trigger a flow in the user’s proxy. The flow’s inputs correspond to the form’s variables.
There are two commonly used functions to convert what we received from the user to what’s expected by a flow’s input:
proxy.partiesFromName (query: String, exactMatch:Boolean ) .iterator().next()— match a node candidate using a given stringAmount.parseCurrency(“${price variable} GBP”)— turn a given String into a Currency type.
Then we can look into a sample code whose role is to enable the Buyer to book a ticket from the Agency with a concertID specified. After this step, if there’s enough balance in the user’s vault, a RequestState will be generated and appeared in the Agency and the Buyer’s vault.

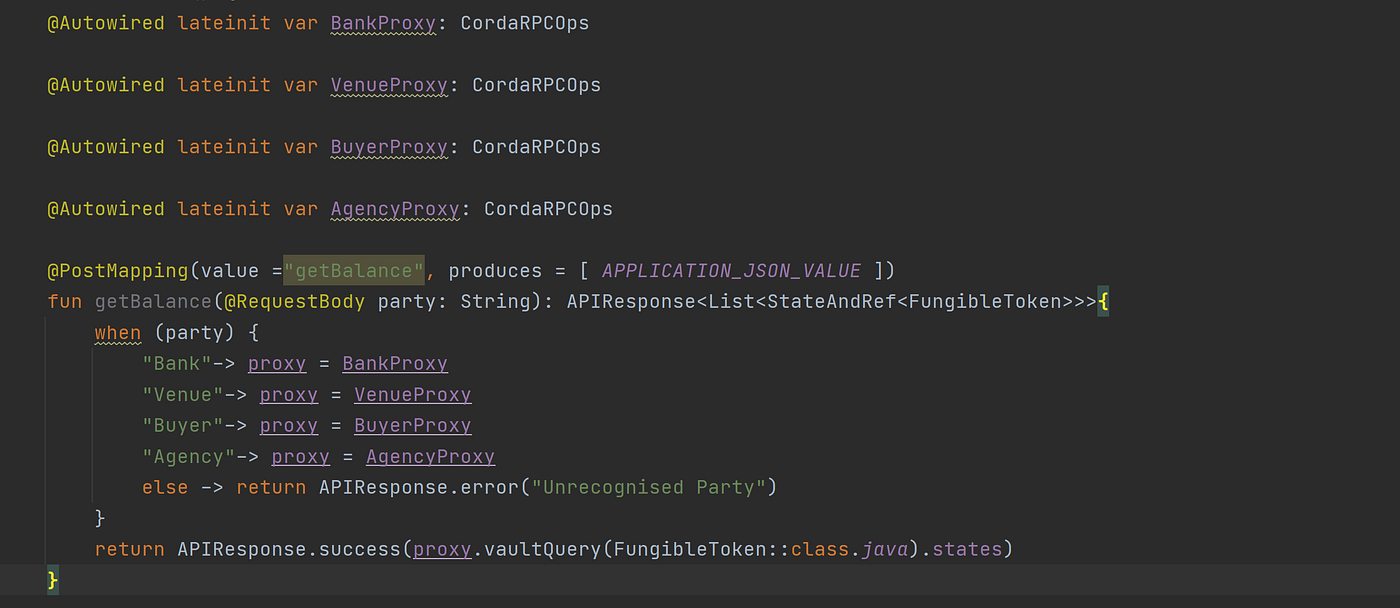
- Switch users
At the beginning of the file, we specify each proxy with the annotation @Autowired, this refers to the function that has the same variable name in the AppConfig.kt. When it comes to changing the user, we get the node’s name from the user end and make changes then.
In this ticket booking example, this change user’s function is bound to the purpose of getting that user’s balance. So as soon as we get the name we want to change to, the When() function acts as the switch() function. For example, if we receive the String ‘Agency’ then our proxy will point to the AgencyProxy variable which is originally from the AppConfig.kt. If this process succeeds, we return the balance of that user using proxy.vaultQuery(). Otherwise, the error message ‘ Unrecognised Party’ will be displayed.
I really hope this blog could help you go through the difficult configuration process and give you a glimpse of how to code API.
- Thanks to Janine L


